Are you wondering on how to make compost for plants in your garden? A decomposed organic material that is abundant in nutrients and can be used to strengthen soil for gardening, horticulture, and agricultural purposes is called compost.
Compost, also referred to as “black gold,” is produced through a natural process that involves the mixing of water with brown materials (such as dead leaves and branches) and green materials (such as grass clippings and weeds).
What are the main ingredients needed in making compost?
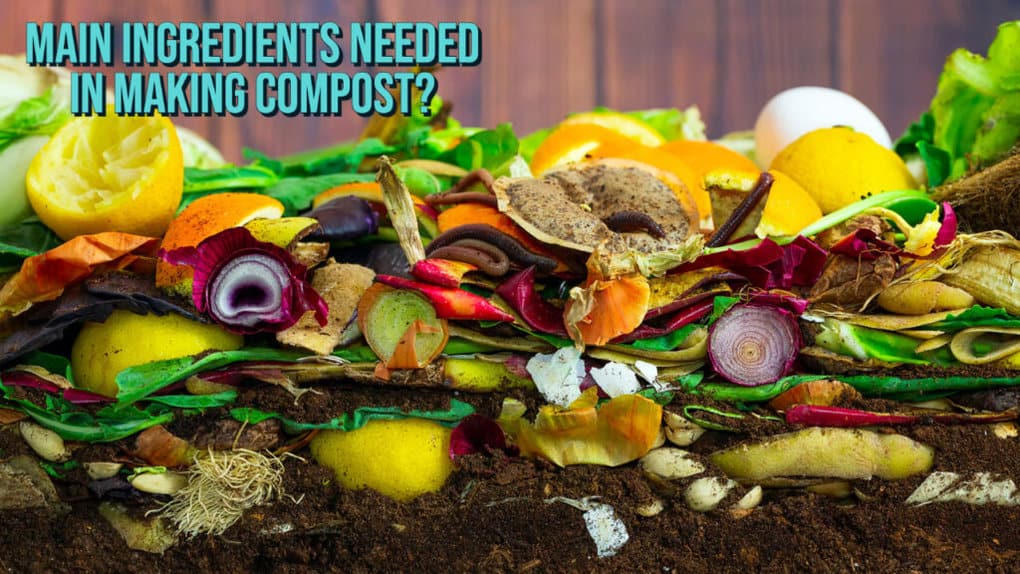
Composting always requires these three foundational components:
Browns. This encompasses things like dead leaves, branches, and twigs, among other things. The browns are where the carbon comes from in the system.
Greens. Materials such as grass clippings, vegetable debris, fruit scraps, and used coffee grounds are included in this category. Nitrogen will be provided by these leafy greens.
Water. In order for compost to develop properly, it is essential to have the appropriate amounts of water, greens, and browns.
The proportion of browns to greens in your compost pile should be approximately the same. In addition to this, you should alternate the layers of organic components with particles of varying sizes. Your compost will benefit from the addition of carbon from the brown materials, nitrogen from the green materials, and moisture from the water, which will assist in the decomposition of the organic waste.
What is the best mixture for compost?
The most practical proportion is a mix of materials that are rich in nitrogen as well as carbon with an equal amount of each. Nitrogen can be found in materials that are lush and green, such as grass cuttings. Brown materials, like stems made of wood and cardboard, are where you’ll find carbon.
It is necessary to add one bucket load of brown material for each green material bucket load that is added. Before adding them, shred any stems that contain wood so that they can be broken down more quickly. Crinkle up the paper, but leave the egg cartons and toilet paper rolls whole; this will help keep the air flowing through the compost.
The majority of compost bins have an excessive amount of nitrogen, which is especially problematic if the primary source is grass clippings; as a result, the resulting sludge is pungent. If there is an excessive amount of carbon in your compartment, the composting process will move at a glacial pace.
Let’s talk about carbon and nitrogen, as well as finding a better combination of brown and green foods than a ratio of 50:50.
What To Compost?
The type of composter you have will have some bearing on the types of materials that can be added to your compost, but there are also some general guidelines to follow. To varying degrees, the components of compostable materials can be broken down into carbon or nitrogen.
The key to having a compost pile that is in good condition is to ensure that the ratio of carbon to nitrogen remains in a state of dynamic equilibrium.
Carbon. Compost gets its airy, light body from carbon-rich matter such as branches, stems, dried leaves, peels, bits of wood, bark dust or sawdust pellets, shredded brown paper bags, corn stalks, coffee filters, coffee grounds, conifer needles, peat moss among other things.
Nitrogen. Raw materials for the production of enzymes can be obtained from substances that are high in nitrogen or protein, such as manures, food scraps, green leaves, etc.
The ratio of carbon to nitrogen in a compost pile that is functioning properly should be very high.
Utilizing one-third green and two-thirds brown components results in a mixture that is superior to one that is composed of equal parts brown and green. Because of their greater bulk, the brown materials let more oxygen into the area, which in turn nourishes the organisms that live there.
An excessive amount of nitrogen produces a mass that is anaerobically dense, pungent, and slowly decomposes.
To maintain proper hygiene when composting, you should cover newly added material that is high in nitrogen with material that is high in carbon. Nitrogen-rich material, if left exposed to air, can produce unpleasant odors; however, carbon-rich material typically emits a pleasant, earthy aroma. If you’re not sure, put in more carbon!
What to put in your compost and some important information:
This table will show you what can be composted as well as provide you with some essential information.
| Material | What does it contain? | Remarks |
| Wood chips or pellets | Carbon | Wood chips have high carbon levels. Please use it sparingly. |
| Wood ash | Carbon | Only uses wood ash that is from clean materials. |
| Tea leaves | Nitrogen | You may use tea leaves that are loose or in bags. |
| Table scraps | Nitrogen | You must add dry carbon items when using this. |
| Straw or hay | Carbon | Straw is best. Hay is less ideal because it has seeds. |
| Shrub prunings | Carbon | Remove the woody part because they are slower to break down. |
| Seaweed and kelp | Nitrogen | Apply seaweeds in thin layers. These are good sources of trace minerals |
| Sawdust pellets | Carbon | Sawdust pellets have high carbon levels. You may add these in layers to avoid clumping |
| Pine needles | Carbon | Pine needles are acidic. It must be used in moderate amounts. |
| Newspaper | Carbon | Avoid using glossy newspaper and colored inks. These may affect the plant in a negative way. |
| Leaves | Carbon | Shred the leaves first because they decompose faster when shredded. |
| Lawn & garden weeds | Nitrogen | Only use weeds that have not gone to seed |
| Green comfrey leaves | Nitrogen | Green comfrey leaves are excellent compost activators. |
| Grass clippings | Nitrogen | Add grass clippings in thin layers so they do not mat into clumps. |
| Garden plants | — | You must only use disease-free plants. |
| Fruit and vegetable scraps | Nitrogen | When using fruit scraps, you must add dry carbon items. |
| Flowers, cuttings | Nitrogen | Any long woody stems must be cut into shorter parts. |
| Eggshells | Both | Eggshells are best when pulverized. |
| Dryer lint | Carbon | The best dryer lint is from natural fibers. |
| Corn cobs and stalks | Carbon | These are very slow to decompose, so it is best if chopped up first. |
| Coffee grounds | Carbon | You may include the filters. |
| Chicken manure | Nitrogen | Chicken manure or wastes are excellent compost activators. |
| Cardboard | Carbon | It is important to shred the materials first to avoid matting. |
You may use some of these materials to create organic fertilizers. To know more about organic fertilizers, you may read Organic Fertilizers: What, Why, and How it is Beneficial for Plants.
Read more: Eggshells for Plants: 6 Benefits and How to use it in the Garden
What should you not put in compost?
- Avoid putting any leftover meat, bones, or fish in the compost because they will attract pests. This will result in unpleasant odors and attract unwanted guests such as flies and rodents.
- You should avoid composting any perennial weeds or diseased plants because the compost could potentially spread weed seeds or diseases to other plants when it is spread.
- Compost that will be used on food crops should not contain any animal manure of any kind. Animal feces have the potential to transmit human diseases such as parasites, bacteria, pathogens, and viruses.
- It is possible that banana peels and orange rinds contain pesticide residues; therefore, these food scraps should not be added to compost.
- Composting the leaves of a black walnut tree is not recommended. The leaves and twigs of the black walnut tree can produce chemicals that are potentially toxic to other plants.
- Eggs and dairy products (such as butter and milk), in particular, are known to be a source of unpleasant odors as well as an attractant for insects and rodents.
- Any of the following: fats, grease, lard, or oils must not be included because they produce unpleasant odors and invite unwanted guests such as flies and rodents
- Plants suffering from disease or infestation by insects are also not recommended. There is a chance that pests or diseases will be able to survive and be passed on to other plants
- The addition of coal or charcoal ash to compost is not recommended due to the possibility that these materials may contain substances that are detrimental to plant life.
- Yard trimmings that have been treated with chemical pesticides could kill the organisms that are beneficial to the composting process.
- Sawdust can be added to the compost, but it needs to be thoroughly mixed in or spread out in a very thin layer to prevent clumping. Make sure the sawdust is free of any machine oil or chain oil residues that may have been left behind by the cutting equipment.
How to make compost for plants?
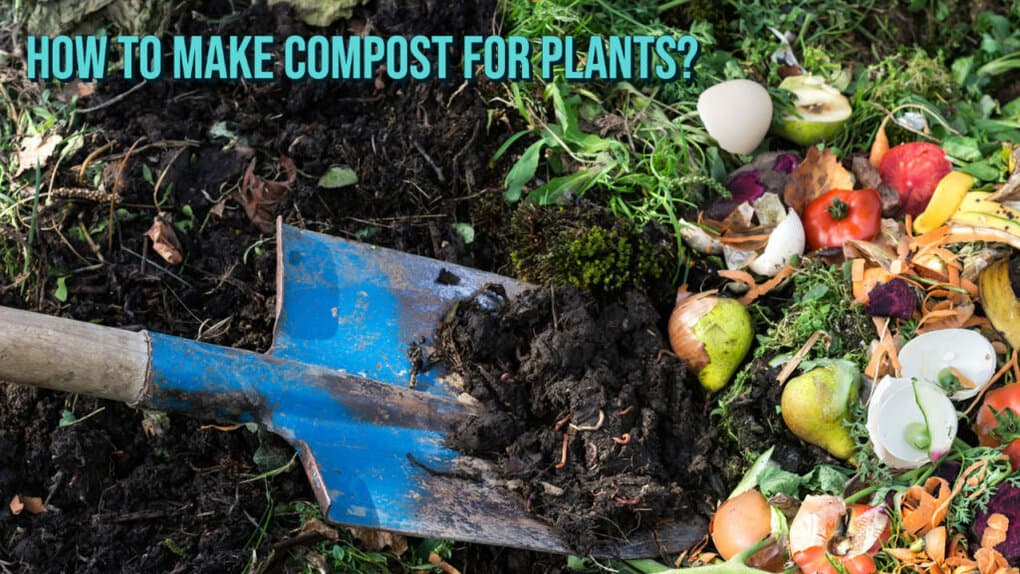
- Your compost pile should be started on bare earth. This makes it possible for worms and other helpful lifeforms to aerate the compost and then move on to your garden beds.
- Put down some twigs or straw at a depth of a few inches to start. This helps the pile drain better and aerate more effectively.
- Add the materials for the compost in layers, alternating between adding wet and dry layers. Food scraps, used tea bags, and various types of seaweed are examples of moist ingredients.
- Put in some manure, green manure, or any other source of nitrogen. The compost pile becomes more active as a result, which speeds up the process.
- Keep your compost moist. Either water the plant on an infrequent basis or just let the rain take care of it.
- Cover it with whatever you have available, whether it be wood, plastic sheeting, or scraps of carpet. A compost pile needs to be covered so that it can keep its moisture and heat for longer.
Covering the compost also protects it from receiving an excessive amount of water from rain. The compost ought to have some moisture in it, but it shouldn’t be soaked or sodden.
Read more: Benefits of Rain Water for Plants: Why You Should Use it?
- Turn. A pitchfork or shovel should be used to give the pile a fast rotation once every few weeks. This gives the pile some oxygen. In order for the process to be successful, oxygen must be present, and turning “adds” oxygen.
If you already have a ready supply of coarse material, like straw, you can skip over this step. If you want to add new materials to your compost pile after it has already been established, you should mix them in rather than adding them in layers. It is essential to mix the compost pile, also known as turning it, in order to aerate the materials that are being composted and to speed up the process.
If you are interested in purchasing a composter rather than constructing your own compost pile, you should think about investing in a compost tumbler that rotates, as this type of composter makes it simple to mix the compost on a regular basis.
How to properly turn compost?
Turning a compost pile should be done with the intention of moving materials from the interior to the exterior and vice versa. You have two choices available to you as a home composter when it is time to turn your compost pile.
The first way is to use a compost tumbler, which is typically sold as a unit and serves as the home base for your compost pile throughout its entire existence. If you are using a compost tumbler, you will need to rotate the barrel at regular intervals to ensure that the compost is thoroughly mixed and that air is allowed to enter the container.
Turning the compost pile using a hatchet or scoop to (quite literally) flip the pile over is the second method that home gardeners utilize, and it is the method that is used more frequently. If you have sufficient space in your garden, you can always put two to three compost bins, which will permit you to move the pile back between the bins whenever you turn it.
Even though they require a large amount of space, multi-bin compost setups are helpful in ensuring that the pile is being combined and that air is being introduced.
How often should compost be turned?
How frequently should I rotate the compost pile that I have? ” All right, here’s the answer: it’s not too complicated.
A minimum of two weeks should elapse between each rotation of the pile in order to allow the core of the heap to reacquire its heat and resume the process of decomposition.
Turning your compost pile helps to promote bacterial activity, which helps speed up the process. This is because the center of the pile will eventually cool down without being mixed, so turning it frequently helps prevent this from happening.
It is recommended that you rotate your compost pile every two to four weeks if you want to speed up the production of compost.
What are the benefits of turning compost?
The timing of how often you should turn your compost pile is directly related to the greatest benefit that can be gained from doing so. The speed of the decomposition process is directly proportional to the number of times that the pile is turned (with an interval of at least two weeks in between each turn).
When the pile is turned, the air is allowed to flow through it, which supplies oxygen to the organisms that help the decomposition process. Consider it in terms of fire for a moment. In order to burn, fires require air. The combination of carbon and nitrogen that makes up your compost pile is analogous to a fire in that it cannot continue to burn without the presence of air.
Because the materials in a pile are decomposing, the pile will get smaller as time goes on. When you turn the compost, the particles that haven’t been completely broken down yet are exposed to fresh moisture and heat, which finishes the process of decomposition.
Similarly, turning the pile tends to help to accelerate the process because of the same reason. As soon as the materials in the center have broken down as much as they possibly can, they will cool down, and the procedure will proceed more slowly. The steady pace of decomposition can be ensured by exposing newly formed particles to the environment.
Have you ever pondered the reason behind your compost pile’s pungent odor? It’s possible that you’re not handing it in often enough. Moving the components around and letting in more air will prevent the materials from becoming matted and will allow some of the water content to disperse into the surrounding air.
It’s also possible that your pile contains an excessive amount of green (nitrogen-producing) materials; in this case, you should make an effort to add a little bit more brown (carbon-producing) substances to the mix in order to strike a better balance.
How long does it take to make compost?
The amount of time necessary to produce compost is contingent upon a number of factors, including the dimensions of the compost heap, the kinds of materials included in the pile, the total surface area of the raw material, and the frequency with which the pile is rotated.
The size of the pile
Use a pile that has a volume that ranges from 3 to 5 feet cubed for the most productive results from your composting efforts (27-125 cubic ft.). This enables the core of the pile to heat up to a sufficient degree in order to facilitate the breakdown of materials.
It is possible to make smaller piles, but the process of producing finished compost will take longer. Larger piles can be created by increasing the length of the pile while keeping the height and depth to a maximum of five feet tall and five feet deep.
Despite this, the ability of a person to turn the materials is a limiting factor in the creation of large piles. You might also find it useful to separate the compost into two distinct piles: one for finished compost that is ready to be used in the garden, and the other for compost that is still in progress.
It is possible that the composting process will take longer if the pile contains more brown organic materials. You can hasten the process by including additional environmentally friendly materials or a fertilizer that contains nitrogen (use one cup per 25 square feet).
The surface area of the pile
Composting takes a certain amount of time, which can vary depending on the surface area of the materials. The surface area of the materials can be increased by reducing the size of the components that make up the materials.
This makes it easier for the bacteria to turn the materials into compost as quickly as possible.
The balance
If you want to have a successful compost pile, you need to have an equal balance of brown materials and green materials, along with the ideal amount of moisture; otherwise, the process will take much longer.
The time of the year
Bacterial activity will increase in response to warmer temperatures, while it will decrease in response to cooler temperatures.
Turning compost piles should be done frequently throughout the summer; however, once late fall arrives and temperatures begin to drop, it is recommended that turning to be stopped so that heat does not escape from the center of the pile.
The number of turns
The rate of composting can be sped up or slowed down depending on how often the pile is turned. You can speed up the process of producing compost by turning the mixture more frequently (roughly once every two to four weeks).
A minimum of two weeks wait time is required before the center of the pile can heat up and reach its maximum potential for bacterial activity. Every four to five weeks, the typical composter will turn the pile.
When you turn the compost pile, make sure that the materials that are in the middle are brought to the edges, and that the materials that are on the outside are brought in.
Compost can be ready to use in about three months, again depending on the time of year, if it is turned frequently and consistently. It is recommended that you stop turning the pile after November in order to prevent heat from escaping from the center of the pile. This is because the activity of the bacteria slows down during the winter months.
Warm temperatures in the summertime encourage bacterial activity, which in turn makes the composting process go more quickly.
Benefits of compost for plants?
Composts are Soil Conditioners
By using compost, you are providing your garden and lawn with a source of nutrient-dense humus. Your plants will benefit from the addition of these nutrients, and the soil will be able to hold onto more moisture.
Compost Allows Recycling of Kitchen and Yard Wastes
Composting can redirect as much as thirty percent of the waste generated in a household away from the trash can. This is significant because once organic matter reaches the landfill, it is deprived of the air it requires to speed up the decomposition process. Instead, as it decomposes, it releases harmful methane gas into the atmosphere, which speeds up the rate of climate change and global warming.
Compost Introduces Beneficial Organisms to the Soil
Compost contains a variety of microorganisms that help aerate the soil, break down organic matter into a form that plants can use, and protect plants from disease.
Compost is Good for the environment
When used as a substitute for chemical fertilizers on lawns and in garden beds, composting provides a more environmentally friendly option.
Compost Reduces Landfill Waste
The majority of landfills in the world are rapidly reaching capacity, and a good number of them have already shut their doors. Compostable materials make up one-third of the waste that is thrown away in landfills.
If we are able to divert this waste from the landfill, then the lifespan of our landfills will be extended (and so will our wild spaces).
Simplest Composting Methods
No-Turn Composting
The compost pile needs to be turned periodically, which is the most labor-intensive part of the composting process. On the other hand, if you use a technique known as “no-turn composting,” your compost can be aerated even without being turned.
When you are constructing the pile, the trick is to make sure that you incorporate a sufficient amount of coarse material, such as straw. Compost will mature at the same rate as it would if it were turned on a regular basis, and studies show that the nitrogen content may even be higher than it would be with compost that has been turned.
When composting using the “no-turn” method, new materials are added to the very top of the pile, and harvested compost is taken from the very bottom of the bin.
Enclosed Compost Bins
Enclosed bins offer the greatest degree of functionality for composting on a modest scale outside. Included in enclosed bins are:
DIY Compost Bin
Constructing one yourself out of a heavy-duty garbage can is the method that will save you the most money. Simply drill aeration holes measuring 1.5 centimeters in diameter in rows spaced approximately 15 centimeters apart all the way around the can. Put a combination of materials that are high in carbon and high in nitrogen inside the can (see the table above).
To prevent the formation of anaerobic pockets and to hasten the composting process, stir the contents of the container on a regular basis. If the lid is secure, the bin can be rolled while it is laid on its side and rolled.
To assist with turning the material, a two-foot-long piece of two-inch-thick cedar can be bolted to the inside of the bin, running from top to bottom. If you do not have this, the contents of the bin have a tendency to remain in the same position as you roll it.
Standard Compost Bins/Digesters
An additional choice is a compost bin, which is also known as a “compost digester” in some circles. Bins for compost are open on the bottom but have sides and the top that are enclosed. This allows them to sit directly on the ground.
Composting bins for homes in residential areas are typically smaller and more enclosed than bins used in commercial composting operations. These composting units are commonly used in residential areas. It may take several months to produce compost using these bins because it is difficult to turn the compost and because the bins are relatively inexpensive.
These containers are made of thin-walled plastic and have the potential to chip along the edges, particularly if they are frozen.
Food Waste Digester
Instead of breaking down the food waste, these so-called countertop composters simply grind it up and dry it out. The procedure can be completed in as little as three hours, at the end of which you will have an odorless substance that can be used as garden fertilizer.
When you are finished, bury the material that was produced beneath the surface of the soil. This will allow the process of decomposition to begin, which will be to the benefit of your plants.
Tumblers
The compost tumbler is the most effective method for turning compost into enclosed bins. It is possible to keep temperatures at relatively high levels in drum/tumbler systems. This is possible for two reasons: first, the container itself acts as insulation; second, the turning of the drum/tumbler keeps the microbes aerated and active.
Some designs include an interior “paddle” or “aeration spikes,” both of which assist in bringing air into the compost and preventing the composting materials from clumping together. A number of alternative designs feature ventilation holes on the extremities. The composting process is sped up significantly as a result of this.
The following are some of the advantages that can be gained from utilizing an enclosed “tumbler” system:
- Facilitates an increased rate of composting.
- Because of its higher temperature on the inside, composting can take place throughout the year.
- Cannot be entered by critters such as rats, raccoons, dogs, or any other animals.
- Compost remains tidily contained and odorless; ideal for use in residential areas and on large apartment terraces
How to Compost at Home
There are many different ways to make a compost pile; we have provided the following for general reference. Helpful tools include pitchforks, square-point shovels or machetes, and water hoses with a spray heads. Regular mixing or turning of the compost and some water will help maintain the compost.
1. Backyard Composting
Compost piles can be assembled in a variety of ways; for the purpose of providing a general reference, we have provided the following information.
Use of pitchforks, shovels or machetes with a square point, and water hoses equipped with spray heads are all helpful tools. Compost stability can be maintained with the addition of water and periodic mixing or turning of the compost.
2. Indoor Composting
You can compost substances indoors using a special type of bin, which you can buy at a local hardware or gardening supplies store, or make yourself. If you do not have an area for an outdoor compost pile, you can compost materials indoors using these methods.
Keep in mind that you need to maintain your pile and keep track of what you add to it. A compost bin that is well-maintained will not reek and will not attract unwanted vermin such as insects or rodents. Within two to five weeks, your compost ought to be ready for use.
Frequently Asked Questions
How to Activate Compost?
“Activators” are something that can be added to your compost in order to help get the decomposition process going more quickly. Comfrey leaves, grass clippings, and chicken manure that has decomposed completely are some examples of common compost activators.
You can also purchase an inoculant at the garden center near you; however, a shovel full of finished compost from another pile will work just as well.
How to Get Rid of Flying Insects in Compost?
The compost pile has a natural allure that draws in fruit flies of various sizes. Cover any exposed fruit or vegetable matter in order to discourage them from eating it. Keep a small pile of grass clippings next to your compost bin, and whenever you add new kitchen waste to the pile, cover it with one to two inches of clippings from the pile you kept next to the bin.
In addition, adding lime or calcium will discourage the presence of flies.
How To Remove Unpleasant Odor From Compost?
This is a potential cause for concern in urban and suburban areas, particularly those with compact lots and neighbors who live in close proximity to one another.
Two practices can help reduce or eliminate odors: first, it is important to keep in mind that bones and meat scraps should not be added to the compost, and second, new additions to the compost pile should be covered with dry grass clippings or another type of mulch.
The addition of lime or calcium will also render odors ineffective. If the compost has an odor similar to that of ammonia, add some materials that are rich in carbon, such as straw, peat moss, or dried leaves.
Why is My Compost Pile Steaming?
Steaming compost is not really a problem. A pile that is hot and steamy indicates that there are organisms working away at the process of making compost.
Why is My Compost Pile Soggy?
A soggy compost pile is a common problem, particularly during the winter months when there is a shortage of carbon-based materials. In order to solve this issue, you will need to bring the nitrogen and carbon levels in your compost back to a healthy balance.
Why are the Matted Leaves and Grass Clippings in My Compost Clumping Together?
This is an issue that frequently arises with the materials that are thrown into the composter. The damp components tend to cling to one another, which slows down the aeration process.
There are two easy solutions to this problem: either place these materials to the side of the composter and add them gradually with other ingredients, or break them apart with a pitchfork. Both of these options are straightforward.
For the best results, the grass clippings and leaves that are being composted should be mixed in with the rest of the materials.
How To Get Rid of Raccoons in My Compost?
If there are raccoons in your neighborhood, they will be drawn to the compost pile that you have because it smells like food to them. The most effective approach to solving this issue is to block their access to the compost. A wooden or metal lid can be conveniently hinged to the container that is described higher up on this page.
Do not try to poison or trap the raccoons because they cause more problems.
What About Those of Us Who Reside in Urban Areas; Is It Possible to Compost Indoors?
You can still cut down on the amount of organic waste you produce even if you live in an apartment or another type of urban location. You can produce your own compost to use for your indoor plants, outdoor planters, or plot in the neighborhood community garden.
Composting can be done indoors in a number of different ways, all of which produce no odor and are small enough to fit even in apartments with limited space.
What To Do With The Weed Seeds in My Compost?
Composting comes with the risk of unintentionally introducing new weed seeds to your garden, which is true regardless of whether you live in a house or an apartment. This is due to insufficient heat being generated during the composting process, which prevented any and all weed seeds from being annihilated.
It is a nuisance to have weed seeds in compost because, once the compost is moved to your garden beds, it acts as a fertilizer for the weeds, making them even more tenacious. Weed seeds can be found in most compost piles. There are two distinct approaches to getting rid of weed seeds when using compost piles or bins at home:
1. Ensure that your compost has reached an appropriate temperature. Put your hand in the middle of the pile; the temperature there should be almost unbearable. To be more specific, the temperature should be between 130 and 150 degrees Fahrenheit. At a temperature of 140 degrees, it takes about 30 days to eradicate all of the weed seeds.
2. Mix your pile. It’s possible that the center of your compost pile is extremely hot, but the edges of the pile are typically much cooler, giving seeds a better chance of surviving.
Because it brings cooler material to the warmer area and also increases aeration, mixing is an important step in the process of achieving higher heat levels. Compost tumblers are an extremely helpful tool for this purpose.
ABOUT THE AUTHOR:

Zany Plant World
Succulent and Houseplant blogJoin me in exploring the beautiful and colourful world of succulents and houseplants, one plant at a time! Zany Plant World blog aims to help newbies and fellow plant enthusiasts grow healthy and happy succulents and houseplants at home. Turning your house into an urban jungle oasis that can give you the zen vibes that we all need in this crazy and busy life.